
Pumpkin Ornament:
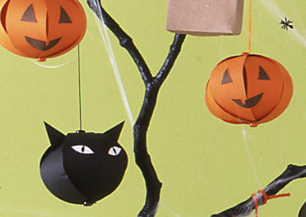
I think I first saw this activity as a Halloween decoration in a Martha Stewart magazine and decided that I'd teach children 4-6 how to do it as long as they knew how to use scissors and had the attention span. This activity contains multiple steps so be prepared to work closely with your group or child depending on your classroom dynamics. The way that I saw these ornaments displayed was on an ornamental tree. Materials that you will absolutely need are brads, orange paper (not card stock), a hole puncher (w/ small tray), scissors, tacky glue, green yarn and a tray to hold the materials. Make sure that there is a place accessible to the children where the templates can be stored.
Invite the child to the activity. Tell the child, "Today we will be making a pumpkin ornament. An ornament is a decoration. This particular ornament is a decoration for Halloween." *smile* Show them where the tray for this job is located and where the paper template is stored on the paper shelf. Take the tray back to the table. Return to the shelf to retrieve a paper template. Return to the table. At this point, run the tip of your finger along the dark black lines of the template where you will be cutting. "This is where we will be cutting. I should get scissors." Carefully retrieve the scissors in the same manner you would in an initial scissor work exercise. (~walking carefully with the scissors on a tray) Begin cutting on the thick dark lines of the template and place the strips you will be using to the left of you. Place any scraps on the scissor tray and use it to discard the scraps. Return to the table after discarding the scraps. Place the scissors back on the scissor tray and place them to the upper right of your work area. Take your materials off of the job tray you originally got from the shelf. Place them in order leaving enough area to work.
1. paper strips
2. hole punch on its small tray
3. small container of brads
4. small green ball of yarn
5. scissors
6. tacky glue
"Now we are ready to construct our ornament." Hold the hole punch properly so that the child can see how your are using it. Punch where ever there is a black dot at the end of each strip. Allow the punched paper to fall onto the small tray. Discard any punched paper and return to the table. Replace the hole puncher above your work area. Take the container of brads and get 2 brads. Count, "one-two". Carefully place one side of each strip of paper onto the brad. Open the brad to secure one side of the ornament. Next, secure the opposite end of the strips of papers in the same way. Except make sure that the brad is pointed into the ornament and not out of the ornament. The ornament should begin taking a round shape at this time. Try not to tear the paper. Your ornament is almost finished! Take the green yarn and wrap it two times around your hand and cut that piece off. Now you have the string that will hang your ornament. Tie a loop on one of the brads for the child if they cannot do it them selves. (Children can learn how to tie at at least age 4 1/2.) You will have a rectangle piece of paper with jack-o-lantern face on it. You may choose at this time to let them take home the card or cut out the black shapes and tacky glue them onto their jack-o-lantern.

NOTE: I try and have a small container of leaf templates for the child to cut out, punch out and write their name on. Either way you will have to decide in your preparation of the activity when and where they will put their name. If you choose not to provide leaves, strips of tape, or pre-printed name tags - they will have to write their name somewhere. It is much easier to write on a flat surface then on a finished round ornament. Just sayin'.
LINKS:
http://www.marthastewart.com/268708/bewitching-tree-decoration
http://www.twopeasinabucket.com/cg_display.asp?cmd=display&seed_id=30366
http://bytesizedpieces.wordpress.com/2010/04/18/stash-bust-pacman-paper-lantern/
http://www.naturallyeducational.com/2010/10/paper-pumpkin-craft/
 |
| http://www.marthastewart.com/268708/bewitching-tree-decoration |
Invite the child to the activity. Tell the child, "Today we will be making a pumpkin ornament. An ornament is a decoration. This particular ornament is a decoration for Halloween." *smile* Show them where the tray for this job is located and where the paper template is stored on the paper shelf. Take the tray back to the table. Return to the shelf to retrieve a paper template. Return to the table. At this point, run the tip of your finger along the dark black lines of the template where you will be cutting. "This is where we will be cutting. I should get scissors." Carefully retrieve the scissors in the same manner you would in an initial scissor work exercise. (~walking carefully with the scissors on a tray) Begin cutting on the thick dark lines of the template and place the strips you will be using to the left of you. Place any scraps on the scissor tray and use it to discard the scraps. Return to the table after discarding the scraps. Place the scissors back on the scissor tray and place them to the upper right of your work area. Take your materials off of the job tray you originally got from the shelf. Place them in order leaving enough area to work.
1. paper strips
2. hole punch on its small tray
3. small container of brads
4. small green ball of yarn
5. scissors
6. tacky glue
"Now we are ready to construct our ornament." Hold the hole punch properly so that the child can see how your are using it. Punch where ever there is a black dot at the end of each strip. Allow the punched paper to fall onto the small tray. Discard any punched paper and return to the table. Replace the hole puncher above your work area. Take the container of brads and get 2 brads. Count, "one-two". Carefully place one side of each strip of paper onto the brad. Open the brad to secure one side of the ornament. Next, secure the opposite end of the strips of papers in the same way. Except make sure that the brad is pointed into the ornament and not out of the ornament. The ornament should begin taking a round shape at this time. Try not to tear the paper. Your ornament is almost finished! Take the green yarn and wrap it two times around your hand and cut that piece off. Now you have the string that will hang your ornament. Tie a loop on one of the brads for the child if they cannot do it them selves. (Children can learn how to tie at at least age 4 1/2.) You will have a rectangle piece of paper with jack-o-lantern face on it. You may choose at this time to let them take home the card or cut out the black shapes and tacky glue them onto their jack-o-lantern.

LINKS:
http://www.marthastewart.com/268708/bewitching-tree-decoration
http://www.twopeasinabucket.com/cg_display.asp?cmd=display&seed_id=30366
http://bytesizedpieces.wordpress.com/2010/04/18/stash-bust-pacman-paper-lantern/
http://www.naturallyeducational.com/2010/10/paper-pumpkin-craft/
No comments:
Post a Comment